 YAMACO 40th
Mr. Dabiguma, I’ve recently become interested in video editing and would like to try using fade-in and fade-out in DaVinci Resolve. Is it easy for beginners to do?


Of course! DaVinci Resolve is a user-friendly tool even for beginners, and applying fade-in and fade-out effects is quite simple. Let’s learn the basic operations together today.


Thank you. Please teach me!


Let’s get started!
Welcome to the basic operation guide for DaVinci Resolve, starting from your 40s! In this article, we will provide a detailed explanation on how to apply fade-in and fade-out effects for beginners.
What is DaVinci Resolve?
DaVinci Resolve is a professional video editing software provided by Blackmagic Design. It’s so advanced that it’s used in the production of movies and TV shows, yet it features an interface that’s easy for beginners to use. Basic editing operations, such as applying fade-in and fade-out effects, can be easily mastered.
What are Fade-In and Fade-Out Effects?
Fade-in is an effect where the video or audio gradually becomes brighter or louder. Conversely, fade-out is where it gradually becomes darker or quieter. These effects help to smoothly transition between scenes or to naturally conclude an ending.
Steps to Apply Fade-In and Fade-Out Effects in DaVinci Resolve
1. Creating a Project
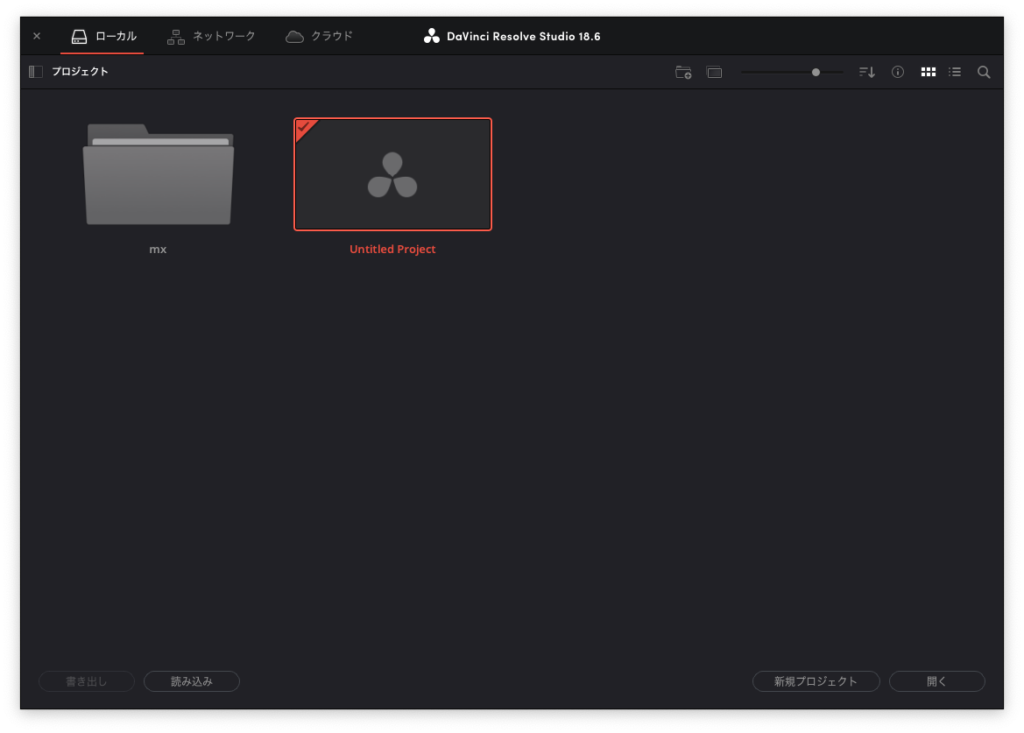
First, launch DaVinci Resolve and create a new project.
- Step 1: On the startup screen, click “New Project.”
- Step 2: Enter a project name and click “Create.”

2. Importing Media
After creating the project, import the video or audio files you wish to edit.
- Step 1: Navigate to the “Media” page.
- Step 2: Drag and drop the files you want to edit into the “Media Pool.”
3. Moving to the Edit Page
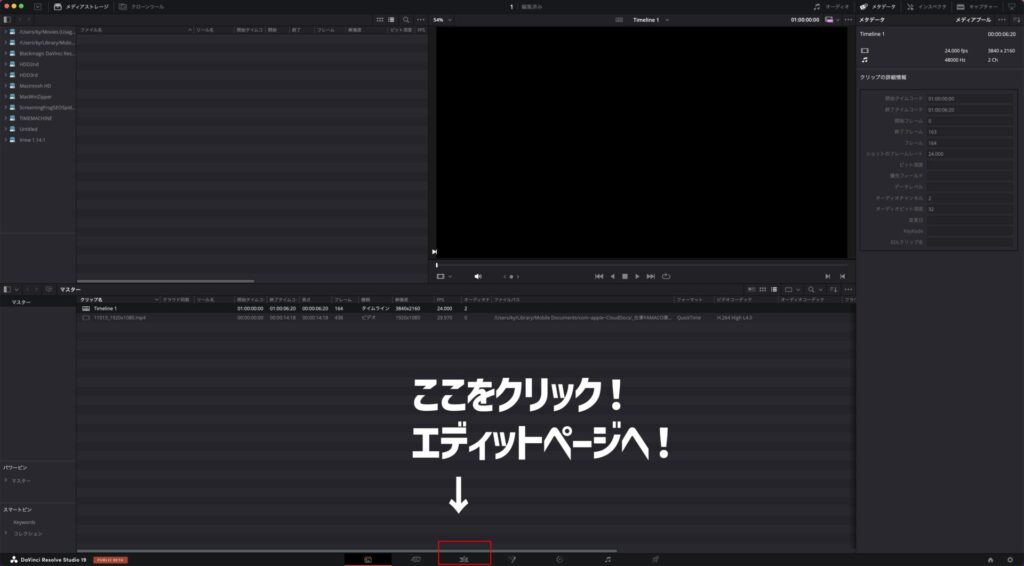
Fade-in and fade-out editing is done on the “Edit” page.
- Step 1: Click the “Edit” tab at the bottom of the screen.

4. Placing Clips on the Timeline
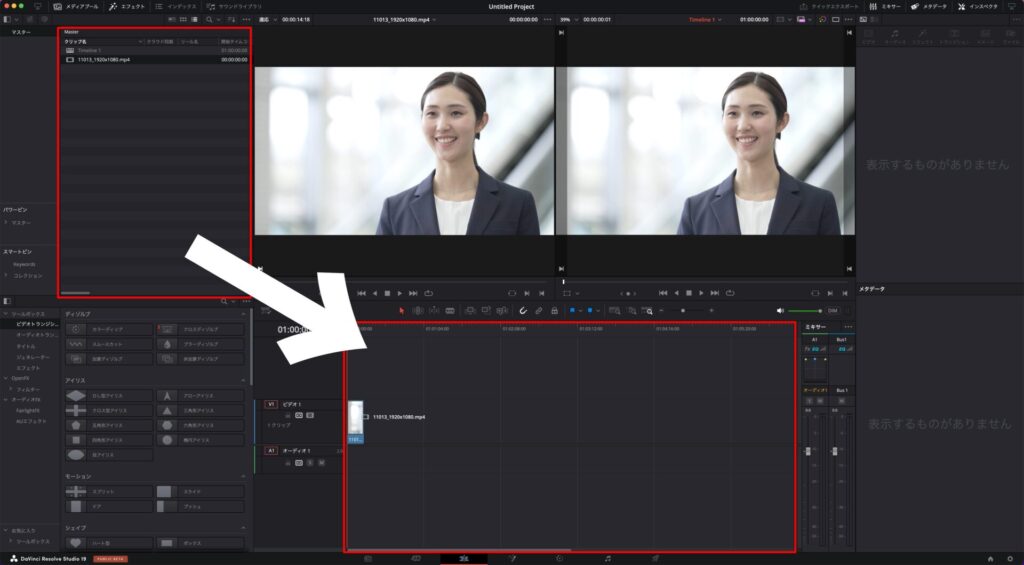
Place the imported files onto the timeline.
- Step 1: Drag and drop the clips you want to edit from the “Media Pool” onto the timeline.

5. Adding a Fade-In
Here’s how to add a fade-in effect to a clip.
- Step 1: Click on the clip in the timeline to select it.
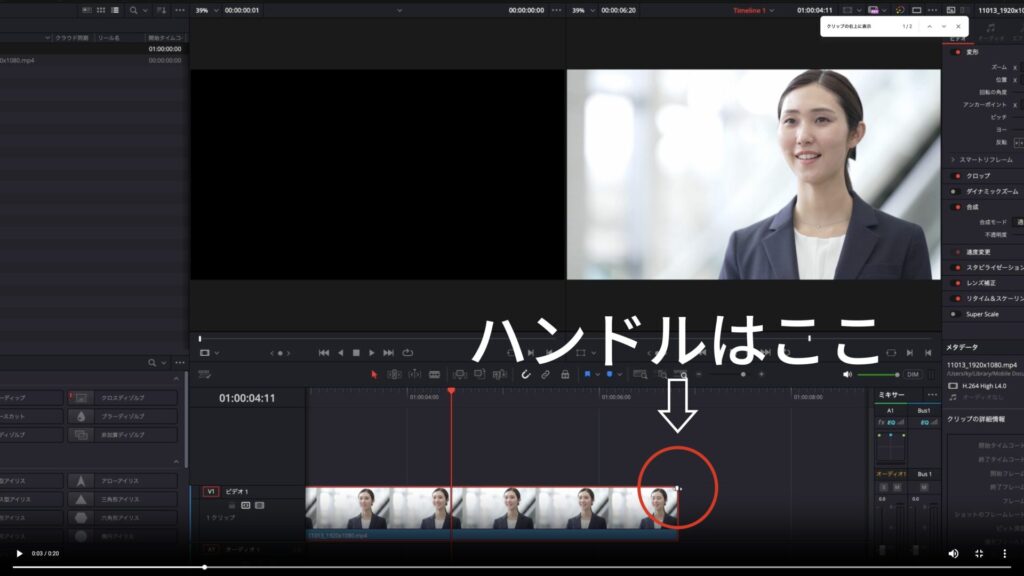
- Step 2: Click and drag the small white mark (handle) that appears at the top left of the clip. This will add a fade-in effect.
6. Adding a Fade-Out
Here’s how to add a fade-out effect to a clip.
- Step 1: Click on the clip in the timeline to select it.
- Step 2: Click and drag the small white mark (handle) that appears at the top right of the clip. This will add a fade-out effect.

7. Adjusting the Duration of Fade-In and Fade-Out
You can easily adjust the duration of the fade-in and fade-out effects.
- Step 1: Drag the fade-in or fade-out handles to adjust their duration.
- Example: Dragging the handle to the left shortens the fade-in duration, while dragging it to the right lengthens it. The same adjustment applies to fade-out.
8. Adding Fade-In and Fade-Out to Text
You can also add fade-in and fade-out effects to text clips.
- Step 1: Select “Titles” from the “Effects Library” and drag and drop it onto the timeline.
- Step 2: Select the text clip and similarly drag the white handle to add the fade effect.
9. Adding Fade-In and Fade-Out to Audio
You can apply fade effects to audio clips in the same way.
- Step 1: Select the audio clip and drag the white handle at the top left (for fade-in) or top right (for fade-out).
Summary
Applying fade-in and fade-out effects in DaVinci Resolve is very straightforward. By following these steps, you can achieve professional video editing results.
- Create a project
- Import media
- Navigate to the Edit page
- Place clips on the timeline
- Add fade-in and fade-out effects and adjust their durations
Mastering these basic operations will expand your video editing capabilities. Give it a try!



Comments